Lesson 1: Bootstrap a Headless App Builder App
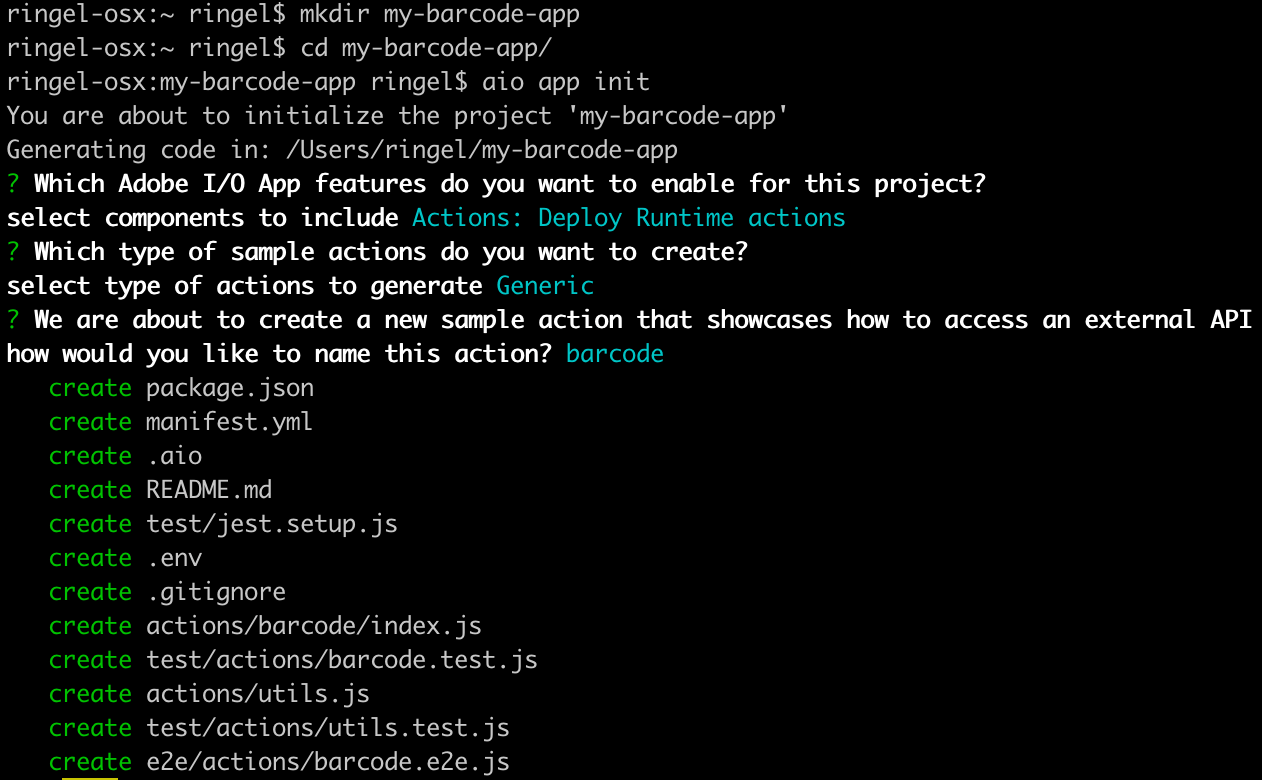
In order to create your barcode application, use the following command:
Copied to your clipboardaio app init my-barcode-app --no-extensions
We select the org, project and workspace for our app, and then be presented with a few options what you want your app to include, for example Serverless Actions, Web UI, CI/CD pipeline, and I/O Events. Since we are building a headless app, we're only interested in using Actions: Deploy Runtime actions.

The second question the CLI asks is which experience cloud or experience platform apps you want to extend or build. In this case, we're going to choose Generic.

To the third question, we'll specify the action name barcode.

From the command line, we are creating a Developer project with everything it needs, from the serverless actions, configuration files, tests, etc.

We didn't include the UI setup, CI/CD pipeline, nor I/O Events. These topics will be covered in other Code Labs.
For our barcode app, we'll start by modifying the following files:
app.config.yaml, which contains all defined actions with their default parameters:
Copied to your clipboardapplication:actions: actionsweb: web-srcruntimeManifest:packages:my-app:license: Apache-2.0actions:generic:function: actions/generic/index.jsweb: 'yes'runtime: 'nodejs:14'inputs:LOG_LEVEL: debugannotations:require-adobe-auth: truefinal: true
package.json, which holds your app name, version and all dependencies that will be bundled when deploying the barcode action:
Copied to your clipboard{"name": "my-barcode-app","version": "0.0.1","dependencies": {"@adobe/aio-sdk": "^2.1.0","node-fetch": "^2.6.0"},"devDependencies": {"jest": "^24.9.0","@adobe/wskdebug": "^1.1.0"},"scripts": {"test": "jest","e2e": "jest --collectCoverage=false --testRegex ./e2e"}}
.env should not be committed, since this is where you'll store your Adobe I/O Runtime secrets (namespace and auth):
Copied to your clipboard# Specify your secrets here# This file should not be committed to source control## please provide your Adobe I/O Runtime credentials# AIO_RUNTIME_AUTH=# AIO_RUNTIME_NAMESPACE=
actions/barcode/index.js is the source code of your barcode action:
Copied to your clipboard/** <license header>*//*** This is a sample action showcasing how to access an external API*/const { Core } = require('@adobe/aio-sdk')const fetch = require('node-fetch')const { errorResponse, getBearerToken, stringParameters, checkMissingRequestInputs } = require('../utils')// main function that will be executed by Adobe I/O Runtimeasync function main (params) {// create a Loggerconst logger = Core.Logger('main', { level: params.LOG_LEVEL || 'info' })try {// 'info' is the default level if not setlogger.info('Calling the main action')// log parameters, only if params.LOG_LEVEL === 'debug'logger.debug(stringParameters(params))// check for missing request input parameters and headersconst requiredParams = [/* add required params */]const errorMessage = checkMissingRequestInputs(params, requiredParams, ['Authorization'])if (errorMessage) {// return and log client errorsreturn errorResponse(400, errorMessage, logger)}// extract the user Bearer token from the input request parametersconst token = getBearerToken(params)// replace this with the api you want to accessconst apiEndpoint = 'https://adobeioruntime.net/api/v1/api-docs'// fetch content from external api endpointconst res = await fetch(apiEndpoint)if (!res.ok) {throw new Error('request to ' + apiEndpoint + ' failed with status code ' + res.status)}const content = await res.json()logger.debug('fetch content = ' + JSON.stringify(content, null, 2))const response = {statusCode: 200,body: content}// log the response status codelogger.info(`${response.statusCode}: successful request`)return response} catch (error) {// log any server errorslogger.error(error)// return with 500return errorResponse(500, 'server error', logger)}}exports.main = main


